We’re pleased to announce that 4.1 is available. As a reminder, version 4 is our secure platform targeted at Government agencies.
4.1 brings version 4 up to the same state as the 3.11 release. This means DMA Directory Services and Device Configuration, Recurring Meeting support for Pins per meeting instance and Participant Snap-Shot images on the Activity Page.
VQCM 4.x is listed on the US Department of Defense Information Network (DoDIN) Approved Product List.
Want to find out more about VQCM 4.1? Contact the VQ team today.
Have you heard of the Cisco TMS alternative from VQ?
Posted on by Katie Burchell
For those of you looking for a replacement for Cisco TelePresence Management Server (TMS), our Cisco TMS alternative contains new and familiar functionality to connect enterprise communications.
The Cisco TMS alternative – VQCM DMA
TMS background
Organisations have depended on Cisco TelePresence Management Suite for many years. Companies have incorporated it into existing on-site CMS and Cisco video conferencing systems.
After developing our Meeting Services functionality for CMS, our customers reached out to let us know they had additional needs and requirements for Device Management.
We’ve listened to what they requested. Fast forward to today – VQ, in close cooperation with Cisco, has developed VQ Device Management and Automation (DMA).
DMA functionality
VQ’s primary goal was providing global customers with a Cisco TMS alternative. While VQ DMA achieves this, it is not an exact replica of TMS. Rather it draws on VQ Conference Manager’s (VQCM’s) existing Meeting Services feature to provide customers with a true Cisco TMS alternative.
VQ DMA brings many of VQCM’s fantastic benefits and features, including the following:
One Button to Push (OBTP)– Allows users to schedule meetings using the VQ UI, Outlook plugin or custom applications (using VQ API)
Directory Services – Compatible with TMS hierarchical phonebooks, Directory Services introduces contemporary labels helping to easily define and quickly filter devices into groups.
Device Configuration – Provides configuration management for Cisco CE and RoomOS devices, including:
Group definitions for device configuration templates
Template Modules providing componentisation of templates, significantly reducing errors and template duplication
Device Maintenance – Allows users to easily monitor, assess, diagnose and treat issues. It includes robust, cutting-edge Kibana-based dashboards, as well as maintenance dashboards with map-based visualisation.
The feedback on VQ DMA as a TMS replacement is already overwhelmingly positive, though VQ DMA is about more than simply TMS feature parity. Instead, as with the existing VQCM Meeting Services capabilities, DMA delivers plenty of additional value, including:
Offers Multi-Tenancy hosting for organisations in ring-fenced groups.
Working tightly with CMS architecture, VQ scheduler enables users to schedule Recurring Meetings with unique PINs/passcodes. Additionally, they can schedule one-time meetings that are deleted upon meeting completion.
Achieves powerful analytics and reporting, thanks to an integrated Elasticsearch database and Kibana visualisations.
Manage meetings anytime, anywhere with self-service tooling, including Microsoft Outlook Add-ins and Plug-ins.
Provides a complete set of APIs with no additional licensing fees. It enables users to integrate VQ DMA with other applications or automation tooling, including Room Booking and Provisioning Systems.
Arrives as a self-contained, virtual appliance. There is no need to install additional databases, and the installation and update processes are straightforward. To ensure complete security, VQCM regularly updates for vulnerabilities.
Designed with enterprises in mind, VQ DMA is built on RedHat Enterprise Linux and runs on VMware.
What happens next?
VQ DMA is off to a great start – and the good news is that there is more to come. Early second half of 2023 we will be adding a brand new, visually appealing End-User client – VQ Conference Manager Metro.
VQCM Metro is a cross-platform user interface (UI). It features an integrated WebRTC client and allows users to manage their conferencing experience.
Additionally, we’re adding WebRTC Software Development Kit (SDK). It aims to enhance existing applications or websites with WebRTC video, voice or content sharing with calls hosted on your CMS infrastructure.
Interested in finding out more?
What does Cisco say about migrating from Cisco TMS to VQ DMA? Read this blog.
Our website is full of useful information about our products. Visit theResources section of our website for further details.
If you’ve any other questions and would like to speak with us, contact us:
Over the last three years, VQ’s licensing model has evolved to better meet the needs of its customers and partners. Whether you’re looking for an all-in-one solution or an a la carte deployment, this blog takes you through the changes we’ve made to streamline the process – making it easier to find what you need.
How does VQ licensing work?
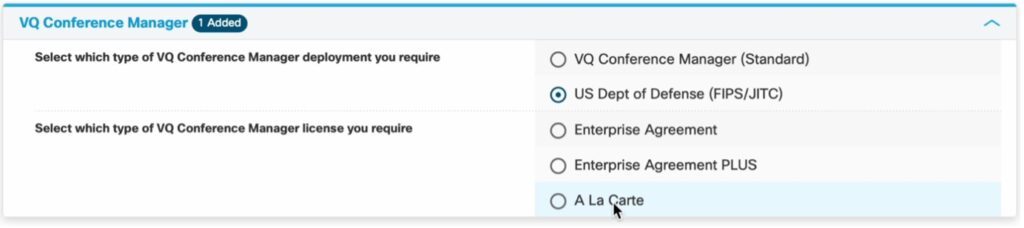
VQ’s licensing caters to standard configurations, as well as those that need FIPS/JITC compliance. There are three configurations to choose from to ensure you’re getting everything you need from your VQ Conference Manager:
Enterprise Agreement
Enterprise Agreement PLUS
A La Carte
We keep our licensing as simple as possible – and have based all three configuration types on three primary parameters:
Cisco CMS licensing model
Number of users
Number of devices
What are the differences between the three licensing configurations?
You begin your configuration by choosing the type of deployment you require, Standard or FIPS/JITC compliant. From there, you have the three configuration types mentioned above.
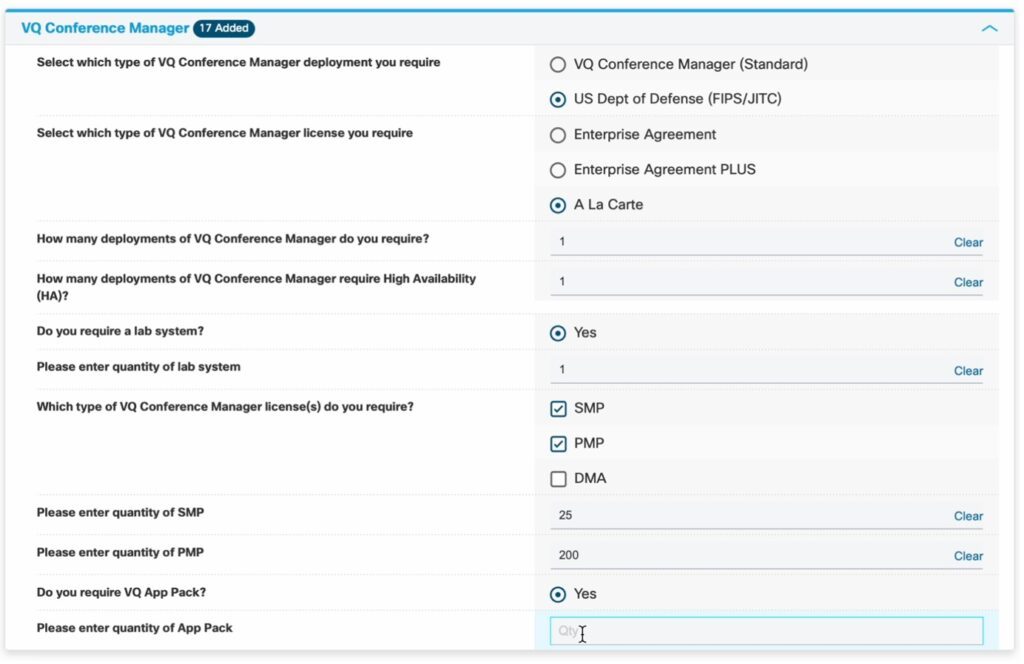
A La Carte Licensing
We’ll start with the configuration method with the most options, A La Carte. In this licensing method, you choose the number of deployments you require, whether you require High Availability (HA)*, and the number of shared (SMP) and personal (PMP) licences.
With the A La Carte configuration method, you can select the correct licensing type and quality to match the CMS configuration. You can also choose whether end users have access to the self-service apps. This build-your-own configuration method offers the flexibility you need with the technology you require.
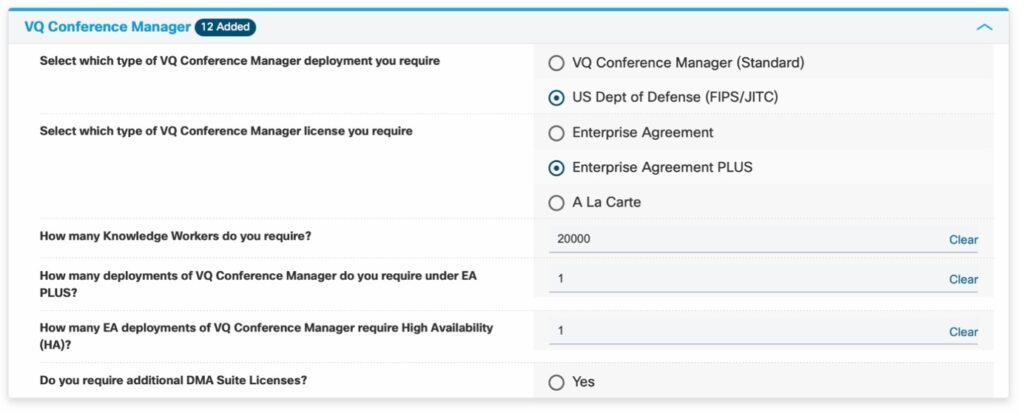
Enterprise Agreement
VQ bases its Enterprise Agreement configuration method on Cisco’s CMS licensing model. So, if you previously used the CMS Enterprise Agreement, this option mirrors one you’re familiar with – with a few VQ differences.
To align with Cisco’s models, VQ has adapted its terminology and definitions. You can see this in A La Carte with SMP and PMP and the Enterprise Agreement with ‘Knowledge Workers’.
Knowledge Workers are any user (employee or contractor) who will utilise the software and/or devices as part of their job duties performed on behalf of your company or organisation.
A difference between an A La Carte and an Enterprise Agreement is the purchasing basis. For A La Carte, you’re buying per-user, while an Enterprise Agreement is company-wide.
Additionally, the A La Carte and Enterprise Agreement allow you to add Device Management licenses separately for One-Button-To-Push (OBTP), Directory Services and Configuration and Management. Alternatively, you can opt for ‘Suite’, which provides all three.
Note: The number of Device Management licenses required is based on the number of devices – not the number of users.
Enterprise Agreement PLUS
New to VQ licensing for 2023 is Enterprise Agreement PLUS. EA Plus makes licensing effortless.
There are fewer options to choose from in this configuration. Simply enter the required number of Knowledge Workers, how many deployments and whether you need HA*. Under this type of configuration, several features come as standard, including:
VQ App pack for all Knowledge Workers
VQ Lab
DMA Suite Licenses (based on one device licence for every 25 Knowledge Workers)
Initial VQ Conference Manager Node
Should the included DMA Suite Licenses not be enough, you can add as many as you need.
Before choosing the type of configuration you need, it’s essential to answer a few questions:
How many deployments do you require?
Will you need High Availability (HA)?
Do you require a Lab System?
Do you want access to the self-service applications?
Do you want to purchase on a per-user or implement a company-wide deployment?
Deployments
Deployments represent the number of VQ instances covered under a license. Multiple deployments are primarily seen in the Enterprise Agreement, where customers run several platforms for geographic reasons, business units or separate networks.
Enterprise-wide licensing is a cost-effective solution. The first license is included as part of your Enterprise or Enterprise PLUS agreement, while all subsequent licenses are chargeable.
In addition to the standard node or deployment, VQ will soon offer High Availability servers. These are three-node servers versus the standard single-node.
Lab Licensing
For customers who wish to run a system in a lab environment, VQ provides Lab Licensing. Running a lab alongside a production environment is something VQ recommends. It enables businesses to implement upgrades in a controlled environment, test updates and allows for the replication of issues for troubleshooting. You can add this for a small additional cost.
VQ App Pack
The VQ App Pack is ideal if you want to use mobile apps, Outlook add-in or Jabber add-in.
When you purchase VQ Conference Manager through an Enterprise Agreement, you buy apps for all Knowledge Workers. Alternatively, if you’re purchasing your solution A La Carte, you’ll need to specify how many of your users will need apps as part of your deployment.
Advanced Analytics
VQ’s advanced analytics is licensed on a per-deployment basis. When customers have multiple VQCM deployments under their core license, each deployment will need its own analytics license.
We hope this article has helped explain the available VQCM licensing options. Determining the most suitable CMS licensing model for your organisation should be discussed with your Cisco partner or account manager.
Feel free to send your questions to info@vqcomms.com or join the AskVQ Webex space here…
VQ Conference Manager 3.11 New Features
Posted on by Katie Burchell
VQ Communications is delighted to announce the latest update to VQ Conference Manager 3.11. In this blog, we’ll discuss the new features and enhancements you’ll find in the latest release. Interested in what’s new in Meeting Services in VQCM 3.11? Read on…
VQCM 3.11 New Features…
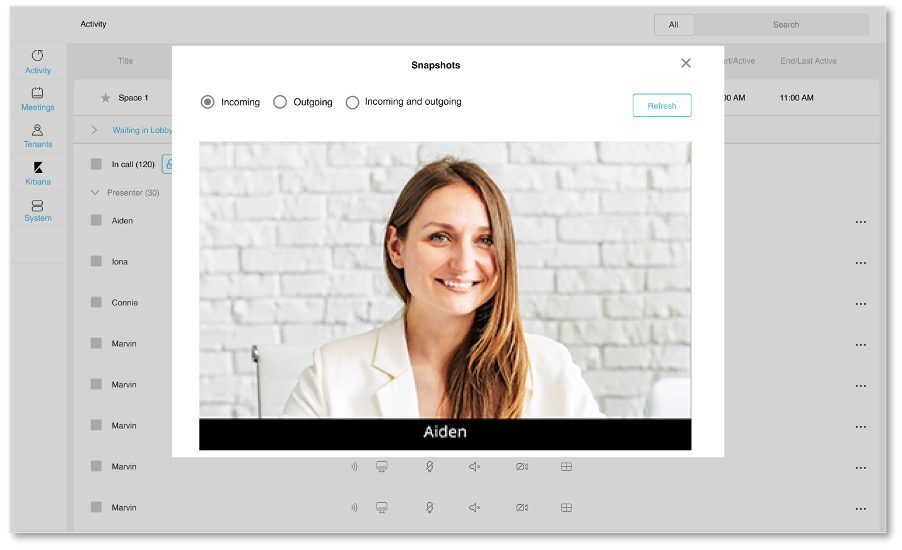
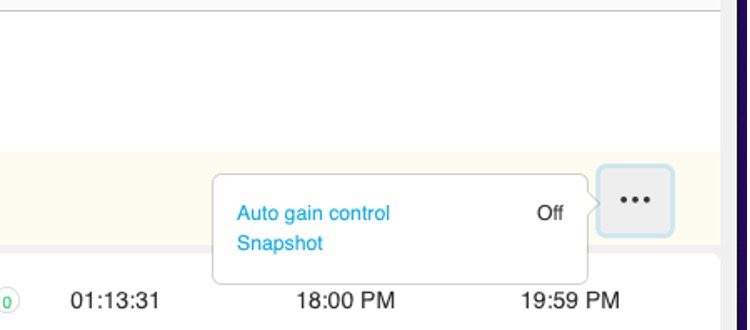
1. CMS Snapshot functionality
For those of us that have been around conferencing and collaboration for some time, the video preview images that used to be available on the previous generation “Codians” have been sorely missed. Therefore, it is great to be re-introducing video Snapshots to the Activity page.
Snapshots are enabled on Cisco Meeting Server (CMS) via a CMS license key. It can be purchased from Cisco. Once you have the CMS license key installed and are logged in as an Administrator, enable “Snapshots” on the People CoApp, at the UX Profile.
Please note: Snapshots are “expensive” in the terms of CMS resource consumption and should only be used sparingly.
We have produced an extensive test report and will make it available as a whitepaper shortly after releasing 3.11. The report shows how this functionality performs under different CMS call loading levels.
So, please work on limiting Snapshot usage to 25 participants across all Operators with Snapshot visibility enabled. VQ’s implementation of this option caches the Snapshot data to minimise the loading on CMS.
The Snapshot is requested via the three ellipses button on the right-hand side of a participant row:
2. Support Recurring Meetings on Temporary Spaces
We’re delighted to share that Recurring Meetings can now be scheduled on Temporary Spaces. The underlying Temporary Space is locked in all periods where no meeting is scheduled and when the recurring meeting sequence completes, it will be deleted.
3. Support One-Time Pins/Passcode on Recurring Meetings
Recurring Meetings on Temporary or named Spaces can be scheduled with each meeting instance having its own PIN/Passcode. Administrators can enable this feature by checking “One Time Passcode” on the Space Template for the type of Space used to host the Meeting.
Please note: One-time pins will be generated using the following rules:
OneTimePins will only be changed for those Space roles who have auto pins enabled. This allows the hosts to keep the same pins for “hosts” if desired.
OneTimePins will be generated such that they match the pin complexity rules for the Space.
Space roles where there is no pin value set will be left unset.
For recurring meetings with Pin per meeting instance, the “auto generate passcode” option on the Space Template role also needs to be set.
In VQ Conference Manager 3.11, only generated PIN/passcodes are supported. We plan to enable user definable PIN/Passcodes in a future release.
Please note: Delivering this feature requires complex logic in the core of VQCM. The feature is new, and we strongly recommend it is adopted cautiously and not used in business-critical meetings until you are comfortable it is working as intended. For the 3.11 release, we consider this feature to be “experimental”.
In addition to these great new features in Meeting Services, we’ve also added Device Configuration to VQ DMA.
VQ Conference Manager Device Management and Automation (DMA) is our latest functionality, providing a modern solution to the challenge of device management.
If DMA is new to you this blog will provide useful information about setting up the system, including importing data from Cisco’s TelePresence Management Suite (TMS). DMA was designed as the on-premise replacement for TMS, developed in conjunction with Cisco. While it’s a replacement, DMA is not a TMS clone – instead, it builds upon the suite with additional features. Read our dedicated blog to better understand VQ Conference Manager DMA and how it can benefit your business.
Here are a few essential things you should know before you get started with DMA.
Profile and ACL use in DMA
It is important to note that within the initial DMA releases, the DMA functionality access control features are not enabled. However, DMA is an integrated ‘module’ of the VQ Conference Manager (VQCM) and requires a ‘non-personal’ user profile to access DMA using the ‘/dma’ URL.
DMA and the Tenant model
DMA has been designed to support the VQCM Tenant model. For each defined Tenant on a platform, there is a separate DMA ‘container’. The devices of one Tenant cannot be seen or managed by the users of any level of another Tenant.
The main sidebar menu item allows a user to switch between the Tenants they have permission for. This feature is designed to support environments where some DMA users are responsible for the devices of more than one Tenant.
System Service Account
It is imperative to have an account set up with the appropriate permissions and security. DMA requires access to read from and write to Cisco devices (systems) at times and an account with ‘Admin’ level rights is required to do this. To align with security good practice, we recommend creating a dedicated ‘Service Account’.
If you already have such an account in use in TMS – this is often the default ‘admin’ account with a changed password – we recommend using this same account to avoid making changes to your devices prior to migration.
The Service Account is also specific to the Tenant, meaning that the security model is maintained at all levels.
How to create a Service Account
Before you log in to DMA, make sure your user has access to the Tenant. Then, log in to DMA and click on the “Tenants” menu item at the bottom of the main menu bar.
You will be presented with a page listing the Tenants on the VQCM server that you have permission to access. Select the Tenant that you want to set up the Service Account for.
The resulting page has only two fields:
Username (for the Service Account) – Enter the Service Account name you want VQ to use to communicate with endpoints
Password – Enter the password you would like to use. Please ensure that you use a suitably strong password that conforms to any organisation security policies. If you rotate passwords on a defined schedule, then this is where it should be updated.
Remember, endpoints must also be updated with the new password.
How to import data from TMS
Export and import tooling and CSV importer
One of the greatest challenges faced when moving to a new management system of any kind is migrating data from systems being replaced.
VQ has addressed this with DMA. It provides tooling where it is possible to:
Extract data from an existing TMS system
Transform data
Load it into the DMA database
Please note: We recommend taking a copy or mirror of the TMS SQL database for migration use to avoid the risk of any performance impact.
In the initial ‘1.x’ releases of DMA, we will provide tools that can be run outside of the DMA platform. These tools can be used to extract and load devices under management, Phone Books and configuration templates from existing TMS systems.
We have a host of additional resources which can assist you in your device management journey.
If you have any other questions and would like to speak with a VQ team member, please feel free to contact us or join our ‘Ask VQ’ Webex space.
What is DMA Directory Services?
Posted on by Katie Burchell
VQ’s DMA Directory Services enable businesses to easily manage large Cisco-collaboration device estates. VQ DMA is designed to replace Cisco TMS and helps streamline processes when using hierarchical Address Book functionality.
So, what is DMA Directory Services? In this blog, we’ll explain the basics, including how to create Address Books.
What are the key elements of DMA Directory Services?
Data Sources
Data sources are the basis of any Address Book that is to be created in, and made available by, DMA Directory Services to the video endpoint devices in your environment
The most important data source for DMA is its list of devices under management, your organization’s devices. DMA predefines this source, naming it ‘Internal DMA’ by default.
DMA supports the creation of Address Books from:
The Internal DMA devices list
Sub-sets (using filters) of the Internal DMA list
Imported data from pre-formatted CSV files
Address Books (Phone Books)
DMA Address Books’ design replicates Cisco’s TMS ‘Corporate Directory’ Phone Book. Creation of the address books is primarily from the DMA managed device list and they are searchable to assigned video endpoints via the same SOAP XML API method used by TMS.
DMA Address Books can be accessed by endpoints set to ‘TMS mode’ in Phone Books with the URL set to your VQ Conference Manager server’s DMA Directory Service.
The Address Books are secure and can only be accessed by ‘Assigned’ (permissioned) groups of devices through the ‘Set on Systems’ command, just like in TMS.
In addition to replicating the method of querying or searching the Address Books, DMA Directory Services supports the presentation of the results based on the hierarchy defined using the Locations feature.
Locations
DMA’s Locations hierarchy works in the same way as the TMS Navigator function. The primary use case for Locations is as a categorization and filing system for your devices.
In the main, organisations use location hierarchies to describe the physical and geographic locations of devices, e.g., regions, countries, states and cities. They might also use an organisational design to clearly identify who owns a device or what it is used for, possibly in an environment where devices are not stationary.
To begin building out or adding to your hierarchy, select the Locations feature from the sidebar menu.
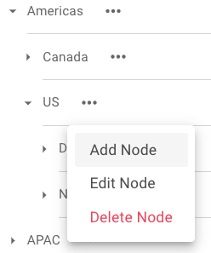
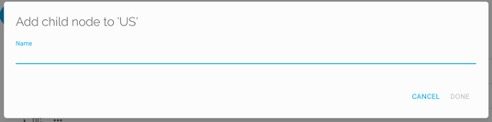
Click on the ‘Add New’ button at the top of the page to create a new top-level ‘node’.
If you want to add a new ‘child’ node to an existing branch, click on the ‘Action’ dots at the end of the chosen ‘parent’ node. You will be presented with a drop-down list of available actions.
Click ‘Add Node’ and you will be given a box to name the new node
Name the new node and click ‘Done’ to save it into the hierarchy. The same process can be used to edit an existing node or to delete a node no longer in use. Please note: To delete a node, it must be empty of other nodes and devices.
Labels
DMA introduces Labels – a new concept not seen in TMS but often seen in more modern workflow applications.
Labels are additional free text tags that can be added to devices enabling additional groupings and identification when filtering devices for actions. Our examples show one of the most common use cases – tagging ‘VIP’ devices – though we’re sure there are plenty of others.
Having discussed the basics concepts, let’s look at how to create and work with Address Books, step by step.
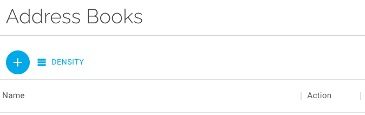
How to create and work with DMA Directory Services Address Books
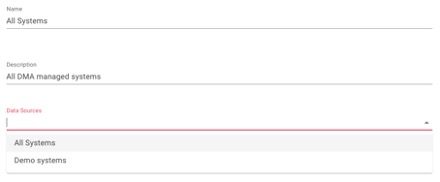
Creating an Address Book
Creating an Address Book requires a Data Source to connect to. Users can add the data source in DMA v1.0 by importing the devices from TMS or from a CSV file using the CSV Import Tool available from VQ.
Step 1
Select the Address Book feature from the side bar menu.
Create a new Address Book by clicking the ‘Add New’ button at the top of the page.
Select the Data Source that will be used to create this Address Book.
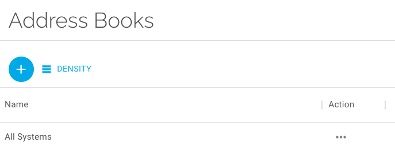
Save the Address Book.
The new address book will now include the new address book.
Step 2
While still in the Address Book, select the ‘Assign to Devices’ tab.
Click the ‘Add Filter’ button to begin creating a list of target devices.
Using the filter creation box, build your device list to be assigned the Address Book.
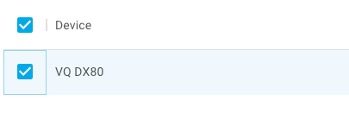
Once you’re happy with the list, check the boxes of any systems you would like to assign the Address Book to and click the ‘Assign’ button to make the Address Book available to the selected endpoint devices.
Tip: The check box next to devices selects all devices on the current page.
Assigning Address Books to endpoints
Use the ‘Assign’ action to provide access to an Address Book from a video endpoint device or group of devices.
Select Address Books from the side bar menu.
Locate the Address Book you want to assign and click on the ‘Action’ button.
Select ‘Assign to Devices’ from the drop-down menu to enter the Address Book assignment tab.
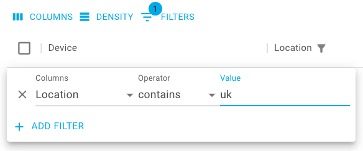
Once in the Assign to Devices page click the ‘ADD FILTER’ button.
Using the filter creation box, build your list of devices that you will assign to the Address Book.
Once you’re happy with the list, check the boxes of the systems you would like to assign the Address Book to and click the ‘Assign’ button to make the Address Book available to the selected endpoint devices.
Tip: The check box next to devices selects all devices on the current page.
Working with data sources
If you want to use a sub-set of the DMA Internal Device list to create an Address Book used by specific devices, you will need to create a new Data Source. The new data source can be filtered to only contain the devices you wish to appear as contacts.
Select the Data Sources option on the side menu bar.
Select the ‘Add New’ button at the top of the page.
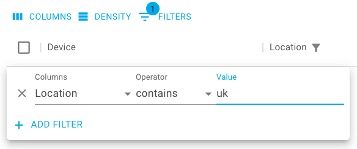
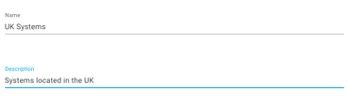
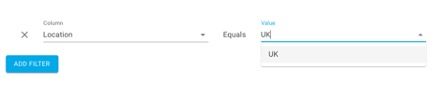
Give the new Data Source a name that describes the devices that you are going to filter into this new source, e.g., ‘UK Systems’
Create a filter that selects only the devices that you want in the final Address Book, e.g., ‘Location – Equals – UK’
Confirm that the endpoints you are expecting to see are now selected and Save the data source.
Note: In this first release of DMA, only one Data Source is available: the Internal DMA device database. This can be created from imported TMS device data or using a specially formatted CSV file.
Future releases will include Data Sources that have been created by connecting to external sources of data such as CUCM, Active Directory or LDAP.
Device Configuration provides administrators and technicians with powerful management tools, but what exactly is it? This blog details the basics.
Device Configuration is where detailed configuration management of Cisco collaboration devices can be performed using pre-defined Templates and Cisco xAPI commands.
It is also where Device Management and Automation (DMA) can be provided with reference information (Locations and Labels) to configure device details in the DMA database.
Please note: In the initial releases of DMA the Locations of devices are extracted from the TMS database and are not directly editable in DMA. Similarly, Labels are also not currently editable in DMA and, of course, will not have been extracted from TMS as it doesn’t support them.
There are ways of bringing devices into DMA with Locations and Labels assigned using our CSV import features. This might be worth experimenting with in your lab environment.
Device Configuration Basics
Important: Device Templates is a new menu item from VQCM 3.11 (DMA 1.1). We recommend reading the ‘DMA Device Templates and Templates Modules’ chapter in our 3.11 Release Notesbefore using the features outlined below.
Device Templates in DMA are the equivalent of the ‘Configuration Templates’ function found in the ‘Systems’ section of TMS. The primary use case for Device Templates is ensuring standard configurations are applied to all endpoints in the environment, assuring critical security, performance and capability settings are maintained.
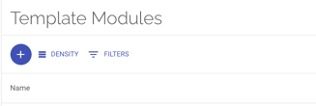
Before creating templates, you will need to create one or more Template Modules. These contain the commands or configuration settings that will be sent to the collaboration device.
Template Modules
Template Modules are a new concept unique to DMA. We have introduced them with the aim to reduce the amount of work required to create, manage and change configurations in large environments.
To begin creating modules in DMA, select the Template Modules menu item on the sidebar menu.
Step 1
Create a new module by clicking the button with a plus sign at the top of the page.
In the Settings tab, give the module a name and description.
Step 2
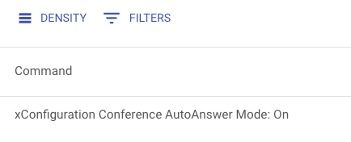
Select the Commands tab to add the required xAPI configurations and commands to the module.
Add commands to the module one at a time. This process can be done either by typing directly into the field or by copying and pasting from the xAPI Reference Guide.
Click ‘Add’ to write the command to the module.
To add a multiline command, tick the Multiline Command check box to activate the multiline command entry box.
Type or paste the command text into the entry box. You must ensure that the last line is a period (full stop), followed by another new (blank) line.
Step 3
Once all the required commands have been added to the module, you can return to the Settings tab to enable the module so it is ready for use in a template.
You must click save to save the commands and settings to the module.
Alternatively, you can click ‘save’ to store the module and return directly to the Template Modules page. Please note that if you do this, the module will be created but disabled until the ‘Enable’ switch is set.
Note: DMA provides a direct link to the online Cisco xAPI resource website.
If you are unable to access this internet resource, you can download PDF versions of the guide here.
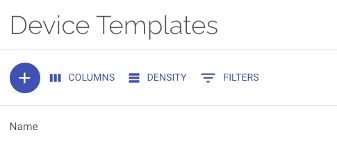
Device Templates
DMA’s Device Templates consist of:
Template modules – containing the required commands or configurations settings
A list of devices that the template must be applied to
Details of when this should be done if ‘persistent’ i.e., to be re-applied regularly to the devices
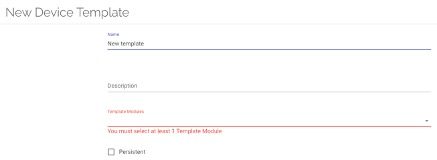
Step 1
Create a new template by clicking the button with a plus sign at the top of the page.
The template must be named and at least one template module must be selected for the template to save.
Select the module[s] to be included in the template using the drop-down menu.
The selected modules will be displayed in the field showing their status.
A ‘green tick’ symbol indicates that the module is enabled, and its settings will be included in the template at run/send time.
A ‘red cross’ symbol indicates that the module is currently disabled and will not be included at run/send time.
Note: The template can be sent to devices in this state, but disabled modules will be ignored until enabled in the Template Modules area.
Step 2 (optional)
If the template is to be re-sent on a regular schedule to devices – in other words, it is ‘Persistent’ – then the Persistent check box must be ticked.
Note: Devices can only be assigned one persistent template in DMA to avoid potential conflicting settings being sent at different times to a template. However, it is still possible to send ‘one time’ settings to a device using a non-persistent template.
The page will automatically display the Apply Time selector to begin setting time, recurrence interval, and day of the week.
Once these settings are chosen, the template can be saved.
Note: Persistent templates can be identified by the persistent ‘chip’ displayed on pages or in lists against the template name
Step 3
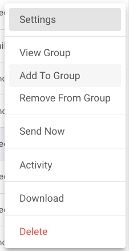
Once saved, you will return to the Device Templates page. You are now ready to begin selecting the devices that the template will be sent to.
Locate the template that has just been created and click on the Action ‘dots’ to display the Action menu.
Select the Add to Group tab to bring up the template action page to add target devices.
Note: The template action page will alert the user to any disabled modules that will be ignored at run/send time and provide a link to identify them.
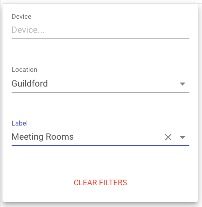
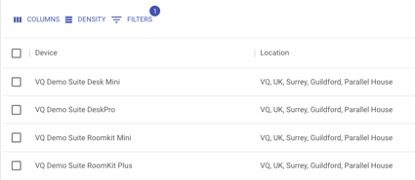
To begin adding devices to the group, a filter is required to identify the required endpoints from the DMA database of devices. Click the ‘Filters’ icon and the filter builder dialogue will be displayed.
Build your filter using the options presented.
The in-scope devices will be displayed on the main page. Click outside of the filter builder to see them.
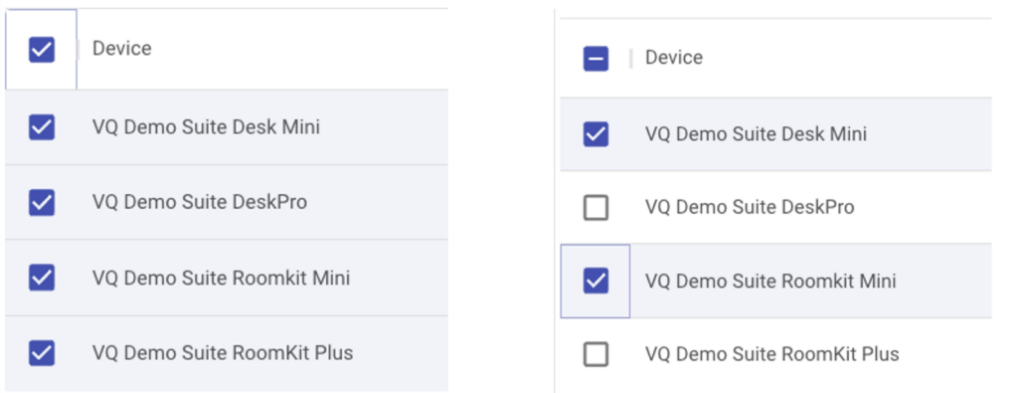
Select the devices to be included in the group by either clicking the ‘All Displayed Items’ check box or individually selecting the devices if not all are required.
Once you’ve selected, click the ‘ADD’ button to add the device to the template group.
Then, confirm the action.
DMA will confirm that you have successfully created the group.
The ‘VIEW GROUP’ tab will now display the devices.
Note: To remove devices, click the ‘REMOVE FROM GROUP’ tab and repeat the above process of filtering and selecting devices.
Step 4
After you’ve created a template and added devices to the group, you may want to send it to those devices rather than waiting for the scheduled time (if ‘Persistent’). Alternatively, if the template is not persistent, it will need to be sent manually to devices using this process.
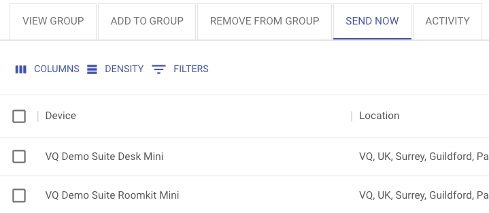
Select the ‘SEND NOW’ tab.
Select the devices from the group that you want to send the template to.
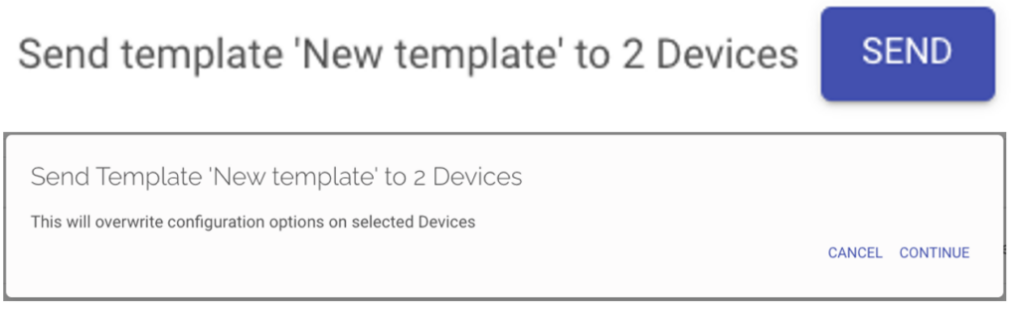
Then, click the SEND button to execute and confirm the send action.
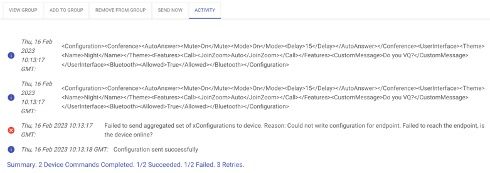
You will be automatically taken to the ‘ACTIVITY’ tab, which displays the status of the send action. A summary of the send action results will be displayed on send completion.
In this example, one device received the template successfully and another failed after three attempts. The failure message will identify the device that failed and provide an explanation or possible reason for the failure.
The template send routine of DMA doesn’t currently check if an endpoint is in a call when sending, this will be added in a future update.
Interested in finding out more?
If you are considering moving to DMA, or are already in the process of doing so, VQ has a host of blog posts that can help:
We’re pleased to announce that VQ Conference 3.11 is now available to download.
The 3.11 release is another big step forwards; we’re now 2 releases into DMA and with this release we’re adding Device Configuration.
TMS users will love the fact we’ve kept some the principals from TMS; we’ve added what we think are some great features – componentizing the configuration files into modules and labels being two to call out. And a great UI.
Several other big things to look out for:
We’ve added a Snap-shot images option to the Activity page. In this first version, we’re limiting it to a single participant per meeting; the plan is that we’ll extend this out in a future release to offer a strip of Snap-shot images per meeting.
Recurring Meetings can now be hosted on Temporary Meetings and, drum roll……., we now support PIN/Passcodes per meeting in a Recurring Meeting sequence.
3.11 looks great and we think you’ll love it. VQCM 4.0 customers can expect to see 4.1 appear in the very near future featuring the new 3.11 functionality. Behind the scenes, the third phase of DMA and some other great things are making their way to completeness which you can expect to see in 3.12 and 4.2.
Interested in finding out more? All of the new features added in 3.11 are discussed in this blog.
2022 End of Year Review
Posted on by mike
2022 has been a big year at VQ and I thought I’d outline some of what’s been happening….
The team has grown quite substantially, we’re now at 40+ people and its always great to see new hires joining and becoming productive members of the team. Product management is now in the capable hands of Jon English and the last 18 months or so of process refinements have resulted in a very well-oiled product development process. This is a big deal as we want to ensure that adding more engineers results in a corresponding increase in output. Marketing has expanded substantially with a large addition of talent from the team at Bamboo.
OurTMS replacement functionality, DMA, is making good progress and about to take its next major step at 3.11. VQCM 3.9 introduced OBTP, VQCM 3.10 introduced TMS Style Hierarchical Phone Books and Directory Services. VQCM 3.11 is due to ship end of January and adds Device Configuration for Cisco CE and RoomOS devices.
Other nice “newness” coming in 3.11 includes CMS Snap-shots and a major lift on recurring meetings with the addition of PINs/passwords per meeting instance. The Outlook plug-in has also had a year-long upgrade cycle to add recurring meeting support, space selection and a range of configuration options to deliver the functionality required by the customer.
We’re seeing strong demand for TMS replacement functionality, our relationship with Cisco is working incredibly well and 2023 looks like it’ll be another exciting year.
To close, from all of the VQ team, I’d like to thank you for being such amazing customers and partners and wish you a great holiday season and new year.